Research-
 When I began research for creating my music video I had used
a computer in order to do all these tasks, this allowed me to research existing
songs that I could possibly use and also helped me gain information about
different genres. I also used a website called surveymonkey in order to gain
feedback about my three possible music video ideas I had come up with. This was
very beneficial as I managed to gain over 60 responses and this gave me the
information needed to help me make decisions that would be well received by my
target audience. I also used the internet as a way to gain research for my
ancillary texts, google allowed me to find images as inspiration for my
magazine advert and Digi-Pak. This was very useful when it came to me creating
these media products, it influenced the style of images I had taken on
location.
When I began research for creating my music video I had used
a computer in order to do all these tasks, this allowed me to research existing
songs that I could possibly use and also helped me gain information about
different genres. I also used a website called surveymonkey in order to gain
feedback about my three possible music video ideas I had come up with. This was
very beneficial as I managed to gain over 60 responses and this gave me the
information needed to help me make decisions that would be well received by my
target audience. I also used the internet as a way to gain research for my
ancillary texts, google allowed me to find images as inspiration for my
magazine advert and Digi-Pak. This was very useful when it came to me creating
these media products, it influenced the style of images I had taken on
location.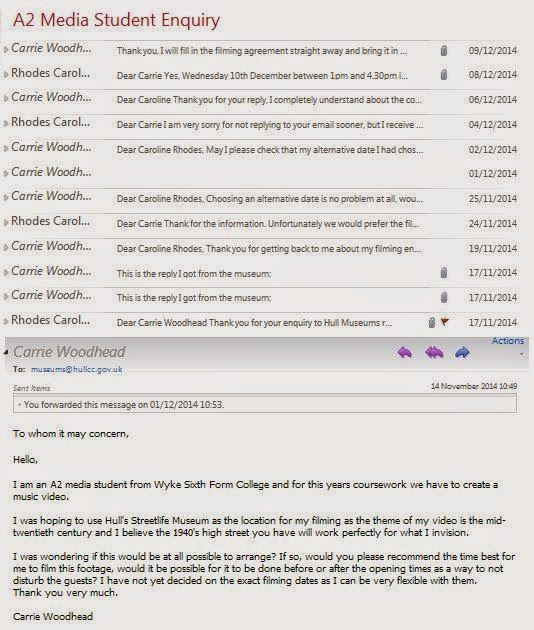 The internet was also the source of communication between me
and the museum location; I initially contacted them through my college email as
a way to politely ask if they allowed people to film indoor the museum. Me and
the events co-ordinator then exchanged a series of further emails to organise a
time of filming that would suit us both, I was also sent a filming agreement to
print out and sign to give upon arrival. Without using this form of
communication it would have been much harder for me to organise to film there. I
had also attempted to contact them by telephone however I could not find a
direct number and only the councils one which I never ended up getting through,
so emailing was definitely much more efficient. Another form of communication through the use of media was with my mobile phone. This is how I had contacted my actress who was in the music video, this way I was able to organise when she would be free for filming.
The internet was also the source of communication between me
and the museum location; I initially contacted them through my college email as
a way to politely ask if they allowed people to film indoor the museum. Me and
the events co-ordinator then exchanged a series of further emails to organise a
time of filming that would suit us both, I was also sent a filming agreement to
print out and sign to give upon arrival. Without using this form of
communication it would have been much harder for me to organise to film there. I
had also attempted to contact them by telephone however I could not find a
direct number and only the councils one which I never ended up getting through,
so emailing was definitely much more efficient. Another form of communication through the use of media was with my mobile phone. This is how I had contacted my actress who was in the music video, this way I was able to organise when she would be free for filming.
 I also used a video camera to assist me in my early stages
of research; I had originally considered using the green screen in some of my
music video shots so I had practised with this technique to see if I would be
able to make this effect. This practice was successful as I found it
surprisingly easy to add this effect in Adobe Final Cut Pro, I did have several
patchy areas around the model though where you could see blurriness or the
background was not cleanly cut out. After I had secured the Streetlife Museum
location I thought the green screen was no longer needed, and considering the
way in which you light a green screen can affect the number of shadows and make
the effect look unprofessional, I thought it would be a wise decision to not
include it in my video. One of my main concerns was that my music video would
look really unprofessional and look like not much effort was put into creating
them, so I thought I would prefer not to take that risk and be more confident
in the clips I use.
I also used a video camera to assist me in my early stages
of research; I had originally considered using the green screen in some of my
music video shots so I had practised with this technique to see if I would be
able to make this effect. This practice was successful as I found it
surprisingly easy to add this effect in Adobe Final Cut Pro, I did have several
patchy areas around the model though where you could see blurriness or the
background was not cleanly cut out. After I had secured the Streetlife Museum
location I thought the green screen was no longer needed, and considering the
way in which you light a green screen can affect the number of shadows and make
the effect look unprofessional, I thought it would be a wise decision to not
include it in my video. One of my main concerns was that my music video would
look really unprofessional and look like not much effort was put into creating
them, so I thought I would prefer not to take that risk and be more confident
in the clips I use.
Construction-
During the construction of making my music video I had used
an even wider range of media technologies. The main one was a video camera to
actually capture the footage for my music video, I had booked one out from the
college to take to my location as I thought these would film better quality
footage than any recording devices I had at home. I also used a tripod
alongside the video camera which allowed me to capture footage from fixed
angles as oppose to relying on handheld camera work which can look bad if not
used in the correct situations. I did however use my own memory card for the
video camera as then I would have a copy of all the clips myself and it would
not have to be wiped clean by the college for the next student to use, this was
in case anything happened to the files transferred to the computer then I would
still have the original copy.
When filming the performance shots I had used lighting for the performance clips in the green screen room. I used a series of these lights as a way to make the lighting as even as possible and also to try and make the background a solid white colour. The lighting also helps the footage to be a better quality and to reduce the amount of shadows that are seen, so they were definitely needed in order to make my music video look to be a better quality.

I also used a camera to take photos on location to later use in my ancillary texts. I did however have issues with this as the camera I had borrowed from college turned out to be faulty and was taking photos with this really strong yellow tinge. Luckily because of the theme I had chosen I was able to edit them so that they had a black and white vintage look to them, I did this within Adobe Photoshop. The photos I took were also used throughout my Digi-Pak, one I took in particular works really well for the back of the CD case where the music tracks are listed.
 The main program I have used during the construction of my media product is the editing software which was Adobe Final Cut Pro. This software is what allowed me to create my music video and is an advanced program in comparison to ones that come included on some operating systems, such as Windows Movie Maker. I used Final Cut Pro on an Apple Mac and had no experience using the software before the start of this coursework. I found this program very simple to use and managed to teach myself most of the processes within it, I did however use online tutorials during my earlier green screen experiments.

 The effects, transitions and options within this program were very beneficial for me when making my music video how I imagined. For example, from quite early on I had planned to use a circle effect at the start and end of my video, so it looks like the video expands from a circle to begin with and then shrinks back down at the end, this very effect was available within the program. I also realised that the amount of colouring effects within Final Cut Pro was quite large, from these options I had selected effects such as "Desert glare" and "Old world" for my clips. It was also very simple to drag clips onto the timeline and to cut them down, I liked how you could have several layers of footage so it was easy to compare two clips and decide which one fits in the best. I had almost no troubles when using this program so it really was helpful to make my video without many issues, however I did have issues when trying to upload my video onto Youtube.
When I saved my music video as a web hosting file everything would appear to be fine, and when I played back the file it would have no issues. When I uploaded the video onto Youtube however it began glitching in certain areas, at these points the footage would pixelate and freeze for a second before carrying on as normal. I never really figured out what was causing this, I tried uploading it from different devices and tried saving the file in different formats. In the end it seemed to work just by luck, I had made no changes to the file since my previous attempt at uploading it however it suddenly began to work perfectly fine and there are no signs of it glitching any more.
I also used Adobe Photoshop as the main program in creating my ancillary texts, which was definitely the best decision for me as I have had a lot of experience in using this program in the past. This allowed me to easily get started and not have to worry about learning how to use different options, I did however learn some new effects such as the "Warp" tool which I sued when editing my ancillary texts onto real life products such as on a bus stop sign. In order to change the colouring of my photographs to give a vintage feel I used the adjustments option, here I could change the brightness and contrast as well as the vibrance of the images. The use of layers in Photoshop was also very useful as it allows you to making certain ones visible when needed and also not merge them all as one image that would then be much harder to edit. I think using this program definitely benefited me as I already had knowledge of how to work it and this resulted me being more confident in my final results. I also created a video showing print-screens of the process of me creating the album art graphic I used for my digi-pak. I used a more simple editing software to put these images together, this being windows movie maker which worked perfectly considering I did not need to use advanced effects within it, the video on a whole just shows the steps it took for me in order to create my final result.
I also used a camera to take photos on location to later use in my ancillary texts. I did however have issues with this as the camera I had borrowed from college turned out to be faulty and was taking photos with this really strong yellow tinge. Luckily because of the theme I had chosen I was able to edit them so that they had a black and white vintage look to them, I did this within Adobe Photoshop. The photos I took were also used throughout my Digi-Pak, one I took in particular works really well for the back of the CD case where the music tracks are listed.
The effects, transitions and options within this program were very beneficial for me when making my music video how I imagined. For example, from quite early on I had planned to use a circle effect at the start and end of my video, so it looks like the video expands from a circle to begin with and then shrinks back down at the end, this very effect was available within the program. I also realised that the amount of colouring effects within Final Cut Pro was quite large, from these options I had selected effects such as "Desert glare" and "Old world" for my clips. It was also very simple to drag clips onto the timeline and to cut them down, I liked how you could have several layers of footage so it was easy to compare two clips and decide which one fits in the best. I had almost no troubles when using this program so it really was helpful to make my video without many issues, however I did have issues when trying to upload my video onto Youtube.When I saved my music video as a web hosting file everything would appear to be fine, and when I played back the file it would have no issues. When I uploaded the video onto Youtube however it began glitching in certain areas, at these points the footage would pixelate and freeze for a second before carrying on as normal. I never really figured out what was causing this, I tried uploading it from different devices and tried saving the file in different formats. In the end it seemed to work just by luck, I had made no changes to the file since my previous attempt at uploading it however it suddenly began to work perfectly fine and there are no signs of it glitching any more.
I also used Adobe Photoshop as the main program in creating my ancillary texts, which was definitely the best decision for me as I have had a lot of experience in using this program in the past. This allowed me to easily get started and not have to worry about learning how to use different options, I did however learn some new effects such as the "Warp" tool which I sued when editing my ancillary texts onto real life products such as on a bus stop sign. In order to change the colouring of my photographs to give a vintage feel I used the adjustments option, here I could change the brightness and contrast as well as the vibrance of the images. The use of layers in Photoshop was also very useful as it allows you to making certain ones visible when needed and also not merge them all as one image that would then be much harder to edit. I think using this program definitely benefited me as I already had knowledge of how to work it and this resulted me being more confident in my final results. I also created a video showing print-screens of the process of me creating the album art graphic I used for my digi-pak. I used a more simple editing software to put these images together, this being windows movie maker which worked perfectly considering I did not need to use advanced effects within it, the video on a whole just shows the steps it took for me in order to create my final result.
Evaluation-

 I have relied on the use of media technologies all the way through the process of completing my coursework, and I have used a range of different ways to present my evaluation. I have used the website Prezi as a way to answer one of these questions as it allows you to easily make a simple presentation to present your work. Prezi also allows you to insert photos, videos and texts so they are interactive as oppose to just writing a word document. I have also used the website surveymonkey once again as a way to gather audience feedback about my ancillary texts, this is a fast and simple way to gather information and it also provides a way to present it in the form of a graph. I used the website called Slide Share as way to present some of my evaluation as well, this allows you to upload a power point presentation and embed it onto a website. This is a good feature as it allows people to view interactive powerpoint presentations online, and there is no way to upload a presentation of this form directly onto blogger.
 Blogger itself has been a key part of the research, construction and planning and evaluation stages of my A2 media advanced portfolio. The website allows me to create my very own blog in a web format and provides me with a unique URL so that people from all around the world can view it. This allowed me to easily share my coursework with my peers as it is all located in one place in a clear format that is easy to navigate through. Blogger also supports many different inputs such as text, images, videos and embed coding of presentations, allowing me to present all of my work in a wide range of different media formats.
I have relied on the use of media technologies all the way through the process of completing my coursework, and I have used a range of different ways to present my evaluation. I have used the website Prezi as a way to answer one of these questions as it allows you to easily make a simple presentation to present your work. Prezi also allows you to insert photos, videos and texts so they are interactive as oppose to just writing a word document. I have also used the website surveymonkey once again as a way to gather audience feedback about my ancillary texts, this is a fast and simple way to gather information and it also provides a way to present it in the form of a graph. I used the website called Slide Share as way to present some of my evaluation as well, this allows you to upload a power point presentation and embed it onto a website. This is a good feature as it allows people to view interactive powerpoint presentations online, and there is no way to upload a presentation of this form directly onto blogger.Blogger itself has been a key part of the research, construction and planning and evaluation stages of my A2 media advanced portfolio. The website allows me to create my very own blog in a web format and provides me with a unique URL so that people from all around the world can view it. This allowed me to easily share my coursework with my peers as it is all located in one place in a clear format that is easy to navigate through. Blogger also supports many different inputs such as text, images, videos and embed coding of presentations, allowing me to present all of my work in a wide range of different media formats.
No comments:
Post a Comment